MTS

23 November, 2022
6 min read
Object detection with Angular, Firebase and Google Cloud Vision
Create a seamless app for object detection using Angular, Firebase and Google Cloud Vision. No pain, only gain.
Today machine vision is really powerful and its trend is high. But not all IT companies hires data scientists or can sustain the effort to create a machine learning app from zero, so it can be very difficult create application and software that perform Object Detection.
I want to show you a simple and easy app, created as use case for GDG Palermo Community Showcase November 2022 - Part 2, that perform Object Detection using:
- Angular;
- Firebase Functions;
- Google Cloud Vision (GCP);
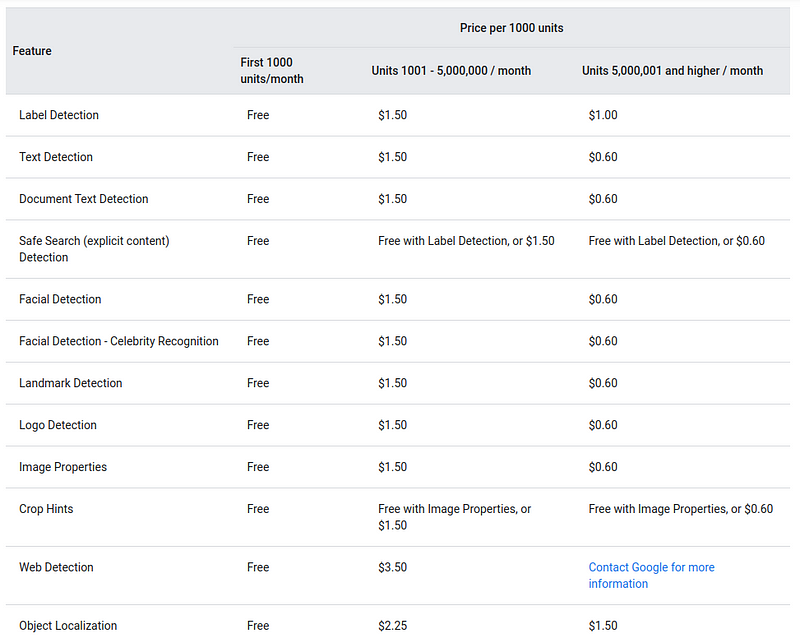
Google Cloud Vision is a very powerful tools and it’s impressive how many things you can do. For example you can perform object detection (as well as we are going to see later), or OCR or even face recognition. It has a plenty of features and each of them has his pricing and, surprise: it’s very cheap.
 Google Cloud Vision pricing table
Usually we think about the cloud as an expensive solution, instead is not (see Google Cloud Vision pricing). As you can see, you pay only ~$1.50 for 5kk requests on month (plus 1000 requests free), imagine that you want to implement this feature on your own from zero, the cost it’s much bigger.
Object detection in Cloud Vision has several features. When you perform a prediction on an image, this tools responds with these info:
- Description of object;
- Score of confidence;
- … Other infos;
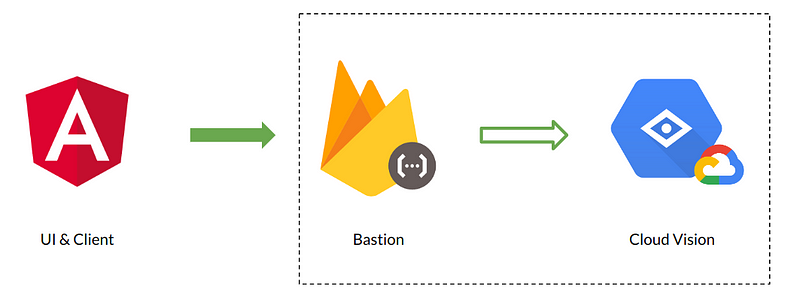
For this app we will use Firebase Functions as bastion, in order to keep controls of requests. In this way we can check if user is authenticated (EG: Firebase functions supports Firebase Authentication)or if his monthly quota of requests is exhausted, furthermore Cloud Vision will be keep private and only Firebase Functions can access to it using a service account.
 Architectural Schema
To implement this app we are going to use:
Let’s code!
The Cloud
For the cloud we have to:
- Create a firebase project via console and upgrade to Blaze plain, in this way it will create GCP project too and give us access to ML tools.
- Access to GCP Console and select the project created.
- Search for product Cloud Vision and enable API;
- Go to IAM > Service Account, create a json key for user firebase-adminsdk and download it.
And its done: our cloud is ready. Go to the code now.
Firebase Function
Now we are going to create our Firebase Function. First of all we need Firebase CLI (Official doc), so we can use Firebase emulators and use the cli to create the codebase.
firebase initThen let the cli guide us to prepare the code, installing Cloud Function and Emulators; then put the “service-account.json” into functions folder and authenticate it:
export GOOGLE_APPLICATION_CREDENTIALS="service-account.json"Then open file functions/src/index.ts and create the app:
import { ImageAnnotatorClient } from "@google-cloud/vision";
import { https } from "firebase-functions";

type AnnotatePayload = {
  image: string; // Base64 of image
};

type LabelDetected = {
  description: string;
  score: number;
};

const client = new ImageAnnotatorClient();

/**
 * This will allow requests to Vision API. Body of payload should be type of {@link AnnotatePayload}.
 * Features in request are compatible with {@link https://cloud.google.com/vision/docs/reference/rest/v1/Feature REST Cloud Vision API}
 *
 * @return List of {@link LabelDetected}
 */
export const annotateImage = https.onCall(
  async (data: AnnotatePayload): Promise<LabelDetected[]> => {
    try {
      const [{ labelAnnotations }] = await client.labelDetection({
        image: {
          content: data.image,
        },
      });

      if (!labelAnnotations || labelAnnotations === null) {
        return [];
      }

      return labelAnnotations
        .filter((a) => a.description && a.description !== null)
        .map((a) => ({
          description: a.description as string,
          score: a.score ?? 0,
        }));
    } catch (e: unknown) {
      const error = e as Error;
      throw new https.HttpsError("internal", error.message);
    }
  }
);
And function is completed. No more code is needed here, so we can start our function using the emulator:
npm --prefix "functions" run serveIn this way, the function will be reachable on localhost:5001 (or whatever port you choose for emulators), and function’s name is annotateImage.
Angular App
Let see the last step: Angular. To help us we are going to use @angular/fire so we need to add it to the angular project and let the schematics guide us to configure Cloud Function (callable), furthermore the cli will create a new app for us into firebase project (we can also using an existing one).
✔ Packages installed successfully.\
? What features would you like to setup? Cloud Functions (callable)\
Using firebase-tools version 11.16.0\
? Which Firebase account would you like to use? myemailtoaccess@email.com\
✔ Preparing the list of your Firebase projects\
? Please select a project: GDG-Object-Detection\
✔ Preparing the list of your Firebase WEB apps\
? Please select an app: object-detection\
✔ Downloading configuration data of your Firebase WEB app\
UPDATE src/app/app.module.ts (1715 bytes)\
UPDATE src/environments/environment.ts (977 bytes)\
UPDATE src/environments/environment.prod.ts (370 bytes)
Schematics configures environment.ts and app.module.ts by default. I encountered a problem with Angular 15, so to fix it import the modules, instead of using the factories and add USE_EMULATOR provider:
import { NgModule } from '@angular/core';

import { AngularFireModule } from '@angular/fire/compat';
import {
  AngularFireFunctionsModule,
  USE_EMULATOR,
} from '@angular/fire/compat/functions';
import { environment } from '../environments/environment';
import { AppComponent } from './app.component';
// ... other imports

@NgModule({
  declarations: [
   // ... other declarations
  ],
  imports: [
    // ... other imports
    AngularFireModule.initializeApp(environment.firebase),
    AngularFireFunctionsModule,
  ],
  providers: [{ provide: USE_EMULATOR, useValue: ['localhost', 5001] }],
  bootstrap: [AppComponent],
})
export class AppModule {}
Then create a service to communicate with the Firebase Function:
import { Injectable } from '@angular/core';
import { AngularFireFunctions } from '@angular/fire/compat/functions';
import { Observable } from 'rxjs';

type AnnotatePayload = {
  image: string;
};

export type LabelDetected = {
  description: string;
  score: number;
};

@Injectable({
  providedIn: 'root',
})
export class ObjectRecognitionFunctionService {
  private callable = this.angularFunction.httpsCallable<
    AnnotatePayload,
    LabelDetected[]
  >('annotateImage'); // put name of function here

  constructor(private angularFunction: AngularFireFunctions) {}

  recognizeObjectInImage(image: string): Observable<LabelDetected[]> {
    return this.callable({ image: image.split(',')[1] }); // clean up data url, from base64
  }
}
Then connect the service with the component:
import { Component } from '@angular/core';
import { first } from 'rxjs';
import {
  LabelDetected,
  ObjectRecognitionFunctionService,
} from '../object-recognition-function.service';

@Component({
  selector: 'app-object-recognition',
  templateUrl: './object-recognition.component.html',
  styleUrls: ['./object-recognition.component.scss'],
})
export class ObjectRecognitionComponent {
  results: LabelDetected[] = [];

  image: string | null = null;

  constructor(
    private objectRecognitionFunctionService: ObjectRecognitionFunctionService
  ) {}

  // .... Other component methods

  /**
   * Start object recognizion, reading from uploaded {@link image}
   */
  recognizeObjects() {
    if (this.image !== null) {
      this.objectRecognitionFunctionService
        .recognizeObjectInImage(this.image)
        .pipe(first())
        .subscribe((results) => {
          this.results = results;
        });
    } else {
      // TODO: handle image error
    }
  }
}
Create a transformation pipe to sort results by score:
import { Pipe, PipeTransform } from '@angular/core';
import { LabelDetected } from './object-recognition-function.service';

@Pipe({
  name: 'sortByScore',
})
export class SortByScorePipe implements PipeTransform {
  transform(values: LabelDetected[]): LabelDetected[] {
    return values.sort((a, b) => b.score - a.score);
  }
}
And finally print results into html:
<div>
  <h3>Results</h3>
  <div *ngIf="results.length === 0; else renderResults">
    <span>No results</span>
  </div>
  <ng-template #renderResults>
    <ul>
      <li
        *ngFor="let result of results | sortByScore"
        role="listitem"
        >{{ result.description }} - {{ result.score | number }}
      </li>
    </ul>
  </ng-template>
</div>
That’s all! Now we can run our app:
ng serve
Conclusions
In a few lines of code we created a simple app that recognize object in an image provided by an user, using just some powerful tools.
You can find the complete versions of code in these repositories:
- https://github.com/mts88/object-recognition-angular-gcp-function/tree/object-detection (Firebase Function)
- https://github.com/mts88/object-recognition-angular-gcp/tree/object-detection (Angular App)
That’s all folks!